
上一篇說明如何使用LINX-LVH讓LabVIEW與Arduino通訊作數位訊號輸出,控制LED,
這一篇接者要說明如何使用LINX-LVH讓LabVIEW與Arduino通訊作類比訊號輸入,
我們使用可變電阻來Demo這個範例的運用,
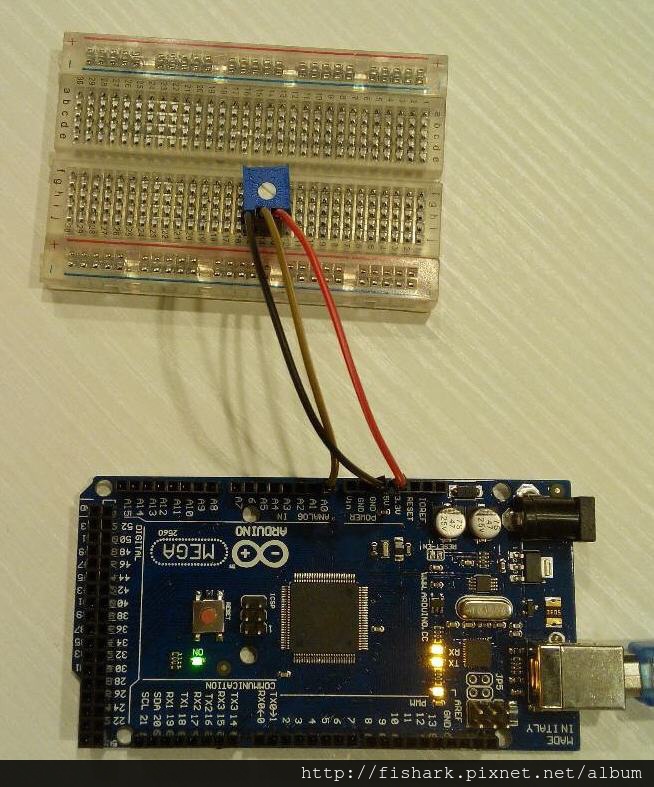
首先將可變電阻皆在萬用板上面,然後騎三隻接腳分別接到Mega 2560的5V,GND與A0,
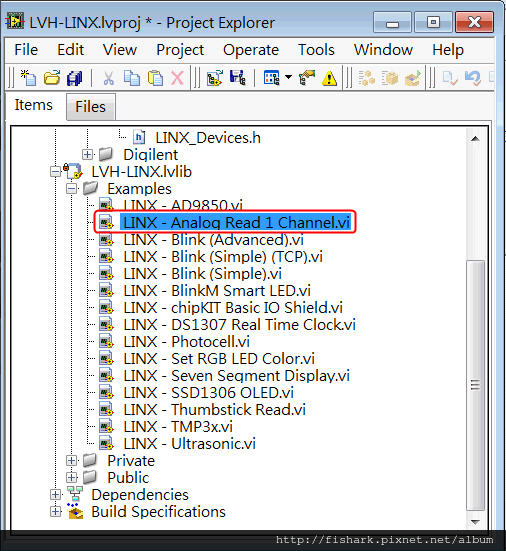
接著在LVH-LINX.lvproj中選擇LINX - Analog Read 1 Channel.vi,
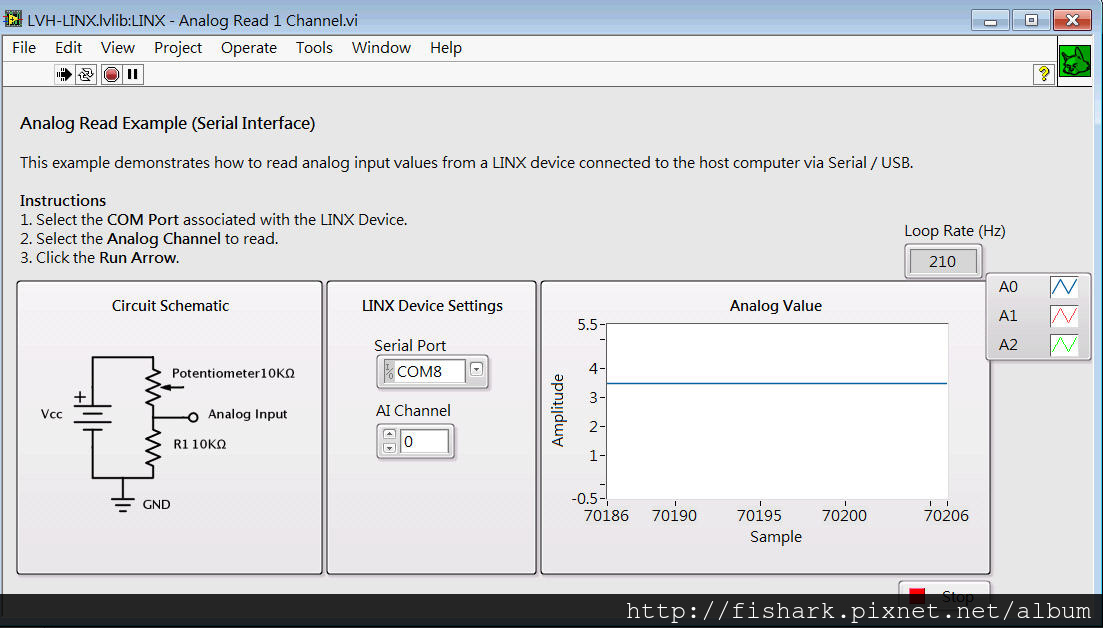
選好Mega 2560所對應的Serial Port,AI channel選擇0,並執行。
我們可以看到Analog Value Chart已經開始有數值,調控可變電阻即可看到Analog Value Chart的值也跟著變化,
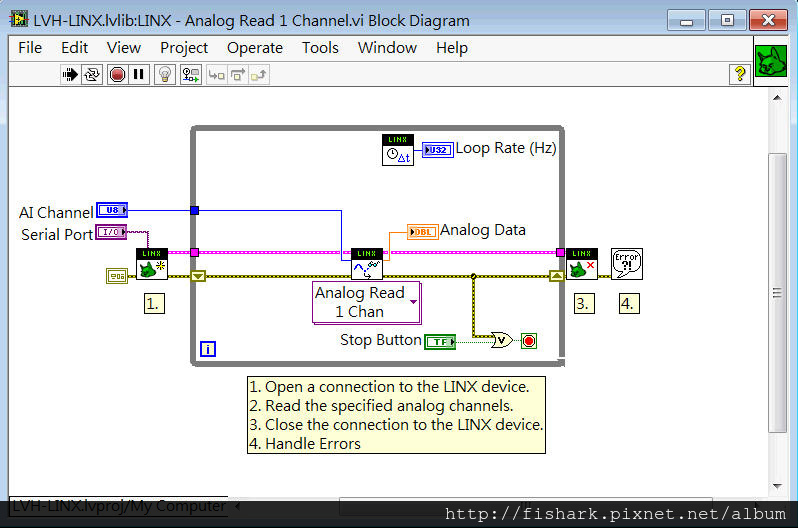
最後是Diagram的程式碼。
文章作者: Jack
版權聲明: 本部落格所有文章除特別聲明外,均採用CC BY-NC-SA 4.0 授權協議。轉載請註明來源 X Workshop|量測自動化 × 嵌入式 × AI 開發實戰!
相關推薦
2017-05-28
Arduino應用:利用analogResolution()增加類比訊號讀取的解析度
I try to increase th resolution of the analog signal. I think there are two methods to fillfull it. One is the adjustment the analog reference which is provided in Mega boards, another is to use higher resolution Arduino boards such as DUE.I had tried these two methods and I wrote down some tips in the following:After I tried Mega2560 and DUE, Mega2560 board can implement the function of analogReference(), but Due didn’t. Due only has 3.3V analog reference. If you want to change AREF of DUE,...
2017-04-16
Arduino問題 WProgram.h: No such file or directory
有時候會在網路上Download一些別人寫好的函式庫與範例, 在執行時會遇到:”WProgram.h: No such file or directory”訊息, 基本上我是在該函式庫的.cpp以及.h中,將原先的”WProgram.h” 改成 “Arduino.h”, 下載的範例即可執行, 如果有遇到類似問題,可以參考看看。
2015-02-07
使用Arduino Uno與DK electronics shield實現多顆直流馬達(DC motor)控制
依我搜尋的結果,DK electronics shield應該是目前可以提供較多種類馬達得驅動控制板。 DK electronics shield可以提供4個直流馬達的控制,stepper motor ,以及2個servo使用, 此shield有提供函式庫, Software Libray 下載,將下載的的.cpp, .h與example資料夾放在Arduino/libraries/ https://learn.adafruit.com/adafruit-motor-shield/downloads 這裡是說明如何使用DC motor的範例, https://learn.adafruit.com/adafruit-motor-shield/using-dc-motors 使用此函式庫可以進行控制DC Motor的前進,後退與停止,非常方便。 Arduino 程式碼: 12345678910111213141516171819202122232425#include <AFMotor.h>AF_DCMotor motor(2, MOTOR12_6...
2015-03-14
感測器(五) 使用Arduino UNO在SD卡中新增檔案(File)
與前篇文章一樣,SD卡不是感測器,但因是在同一類主題中討論,故列入。 只要是感測器的資料擷取,通常需要儲存, 尤其是行動式的裝置,SD card更是常用的儲存硬體, 我們使用Arduino IDE內建了一些SD卡的範例程式, 其中SD–>File範例,說明如何在SD中新增一個檔案: * SD card attached to SPI bus as follows: ** MOSI - pin 11 ** MISO - pin 12 ** CLK - pin 13 ** CS - pin 4 1234// On the Ethernet Shield, CS is pin 4. Note that even if it's not// used as the CS pin, the hardware CS pin (10 on most Arduino boards,// 53 on the Mega) must be left as an output or the SD library// functions will not work. 依註解說明,使用U...
2020-08-15
[Arduino] Edit Arduino code to control RGB LED in VS code/使用VS code編輯Arduino程式碼來控制RGB LED
This video show the blinking of RGB LED controlled by Mega2560. 本影片展示用Mega2560控制RGB LED閃爍的狀況。 Next video will express how to implement it by editing the Arduino code in the VS Code. 下一個影片將說明如何使用VS Code來編寫Arduino code來實現這樣的控制。 This video shows how to write the Arduino code of RGB LED blinking by using the VS code. 本部影片展示如何使用VS code去編輯控制RGB LED閃爍的Arduino程式碼。 Hardware: Mega2560 硬體: Mega2560 Steps: Use command “Arduino: Initialize” to create .ino file. Modify “c_cpp_properties.json” to add t...
2015-07-07
Arduino Due 功能測試 (一) DAC Output
最近剛入手了Arduino Due,原因是因為是用Cortex-M3的MCU,想試一下這片板子的功能, 首先,來測是Due提供的DAC功能,分別有DAC0, DAC1兩個接腳可以使用, 經過一些搜尋,主要有幾點要注意: 1. You must use Arduino IDE 1.5 or later to program the Due–>要使用Arduino IDE 1.5以上的版本。 2. The microcontroller mounted on the Arduino Due runs at 3.3V, this means that you can power your sensors and drive your actuartors only with 3.3V. Connecting higher voltages, like the 5V commonly used with the other Arduino boards will damage the Due.–>使用3.3V,5V的電壓會傷害Due。 3.https://www.arduin...
公告
本站文章自痞客邦(2006–2024)搬家而來,舊文章的程式碼與圖片如有缺漏,歡迎留言告知。